December 2023
20th December
Some Suite treats to end the year! We've made the following updates today:
- File names are now included in the body of the Completed! signing email
- We've made the suggested file template name editable
- You can now use the Open in Office button for .csv files, allowing you to edit these in the desktop version of Excel
- When downloading a folder, this will no longer included archived files if the archive toggle is off.
This rounds out our final release for the year. You can check our top feature priorities to see what's in store for early 2024.
August 2023
31st August
New! You can now Edit Signees after sending out signing requests. This includes the ability to change a signees email address, add or remove signees.
Please note that the edit signee capability is only available for non-sequential signing. If you have sent document(s) for signing and have turned on sequential signing, you will not be able to edit signees. However, this feature will be available in a future update.
- In the Document Signing dashboard click Manage Signees to the right of any document In Progress.
- Then, click Edit Signees.

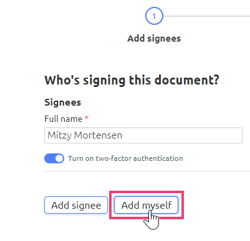
- You will be redirected to the Add signees step.

- As this signee has already viewed the document, this person cannot be edited. The only way to ensure that this person does not sign the document is to cancel the signing request for everyone and resend it.
- As these signees have not opened the signing link, their details can be edited or deleted. You can also toggle on two-factor authentication.
- You can add new signees including yourself.
Note: All annotations for any edited signees will need to be reapplied in the following steps.
- Go through the further steps and save any changes.
To learn more about the rest of the changes in this update, please read the full article here: Introducing Edit Signees in Document Signing.
June 2023
30th June
Today we've released our new Bulk Folder Generation feature for Super Suite customers, plus a new look in the Admin Settings screen for all customers.
New! Introducing Bulk Folder Generation.
SuiteFiles customers on Super Suite can now create folders in multiple Client folders at once. Perfect for adding new financial year folders and subfolders to your clients!
SuiteFiles Admins can head to the Admin settings page and click Generation and Rules. Click Bulk folder generation and the below window will pop up.

- The name of the folder that will generate in the selected client folders e.g. 2024
- Optional select template drop down
- Filter clients by name. You can include multiple clients in the filter and paste in a comma-separated list if required

- Click the boxes to select the clients relevant to the folder generation. Click the box next to Name to select all
- Click generate and type CONFIRM in the dialogue box to start your folder generation

Please read the full article here: Introducing Bulk Folder Generation. If you are on the Semi-Suite plan, or are on Super Suite and have more complex requirements, you can still get bulk folders created by our team. Simply completed our Client folder generation form here.
New! Admin settings page update
Along with this update, we have given the Admin Settings screen a new look and feel! The Admin options now appear as tabs across the top of your screen.

May 2023
22nd May
New! We have updated the Document Signing Dashboard, giving you a better view over your documents that are signed or pending signing.
- The new navigation allows you to view the progress of your documents out for signing under the Sent tab. My Hidden displays any files you have hidden using the new Hide signing request button available under the file options. This replaces the previous Archive function.

- SuiteFiles Administrators now have access to view the entire teams documents out for signing under the All and All hidden tabs. Custom branding is now found in the Admin view tab for administrators to change the document signing branding.
Document Signing Overview
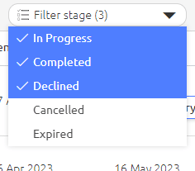
- Filter stage allows you to filter documents by the different stages they are at; In Progress, Completed, Declined, Cancelled or Expired. You can select multiple stages to filter.
- Search allows you to search by document name.
- Filter by signees allows you to filter your list by Signee name. You can select multiple signees.
The three dots next to the document name in the Stage column represent whether the document has been opened, signed or completed by the signers. The dots turn blue when this action is completed.
- If you want to change the expiry date of an In Progress document, click Extend Expiry under the Expiry column. You also have the ability to Manage Signees and edit parts of the signing process after the fact.

- You can view the original document in SuiteFiles by clicking on the name of the document on the left. To open a PDF version of the signed document in a new tab by clicking View Document. For documents completed after the signing dashboard release (17/04/23), this will take you to the _signed.pdf in the SuiteFiles folder location. Documents completed pre-release (17/04/23) will open up in a new tab in your browser.

File Options
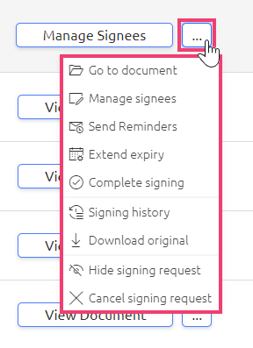
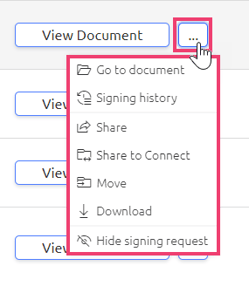
We've also made some changes to the file options available, which will differ based on the stage of the document.
| In Progress | Completed Document |
 |
 |
- Use the Complete signing option to manually complete a document that hasn't been signed by all recipients. All signatures added to the document up to that point are retained. Documents completed in this way will show up as "manual complete" in the signing history.
- Signing history allows you to download the signing certificate.
- Hide signing request replaces the old Archive function. This hides the document from your Sent tab and moves it to the My Hidden tab.
For the full list of options, click here.
Bulk extend expiry dates
- The document signing dashboard now allows bulk actions for extending the expiry. Select multiple documents using the checkboxes on the left, and click Extend Expiry in the top right corner.

To learn about the rest of the changes in this latest signing update please read the full article here: Introducing the New Document Signing Dashboard.
April 2023
5 April
- New! We've added the ability to add images to PDFs. To add an image, click the Image icon when in Annotate or Edit mode in any PDF.

- We've also made a fix for Semi-Suite customers who were unable to annotate PDFs.
March 2023
30 March
A few changes are out today including:
- A Jump to next button has been added to mobile document signing.
- The PDF thumbnail sidebar has been moved to the right side when previewing or editing a PDF.

- All signing fields are now coloured on the Step 2: Prepare Document stage, making it easier to identify which fields belong to each signee.
- Checkboxes for document signing can now be resized, perfect for those who need a smaller check box when signing their documents.
27 March
Version History is now available in the SuiteFiles Web App.
- To view the history of a file, navigate to it in the SuiteFiles Web App and click the row.

- Click the info icon to expand the right hand side panel.
- Scroll down and click History

- On the Version History screen, you can:
- Click Download to preview a file before restoring it. Please note this downloads a copy of the file to your local computer.

- Click Restore to restore a particular version of the file. Please note this will create a new version of the file.

The new version of the file will now be at the top of the Version History table, and will be the one you see when opening the file in SuiteFiles.
- Click Download to preview a file before restoring it. Please note this downloads a copy of the file to your local computer.
22 March
The SuiteFiles x Karbon integration is here!
The Karbon and SuiteFiles integration will bring your Karbon contact and organization data into SuiteFiles.
Karbon Integration Overview
With SuiteFiles and Karbon integrated, you can:
- Populate your client documents and emails in SuiteFiles with organization data from Karbon.

- Look up Karbon contacts in SuiteFiles and invite them to the SuiteFiles Connect portal

- Look up Karbon contacts in SuiteFiles to request their signature
- See if a SuiteFiles Client folder has found its Karbon match. A Karbon icon will appear in the Integrations column in the Clients folder

How do I get started?
For step by step instructions on connecting and using the Karbon integration see: Setting up the Karbon integration. We've also got a list of Karbon merge fields that can be used in file and email templates.
If you have any questions on the integration that aren't covered in the above, please reach out to us via support@suitefiles.com.
15 March
Introducing Sequential Signing
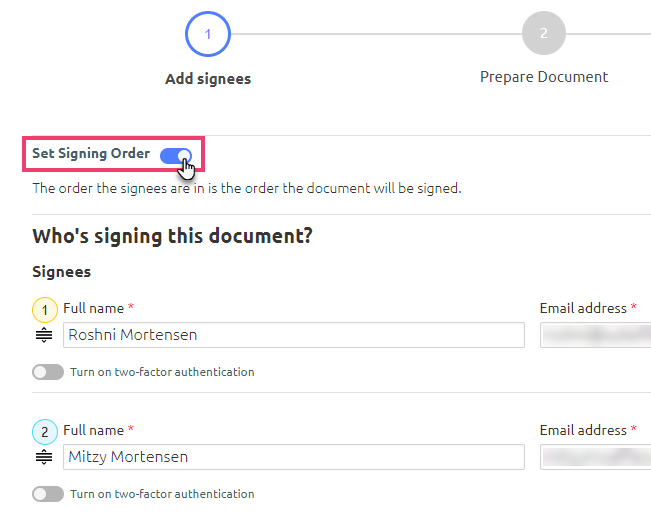
You can now set the signing order for document signing requests!
- Once you’ve added a second signee on Step 1: Add signees, you can toggle Set Signing Order on
- Use the
 icon to move the signee up or down to change the signing order
- You can also change the number in the coloured circle to reset the order. For example, typing 1 next to Mitzy’s name in the below example switches her from position 2 to position 1, and reorders the other signee to position 2
- Continue with the signing process and send the document
- When viewing a file that has used sequential signing in the Document Signing Dashboard (under More > Document signing) hover over the In Progress status bar to see per signee if the document has been sent, is awaiting a preceding signee or has been signed


- At the recipients’ end, the first signee will receive an email requesting their signature. Once they have signed the document, and second signee will receive their email and so on
- All subsequent signers will see the previous signees’ signatures when viewing the document
13 March
- New! If you're the only one signing a document, you'll no longer see Step 3: Message during the signing process. Simply press Finish on Step 2: Prepare Document to complete the self-signing process.
- We've also rolled out a fix for an issue with task completed emails failing to send out.
8 March
Introducing Signing Message Templates
We’re excited to announce that message templates for document signing requests are now live in SuiteFiles!
As you step through the signing process, you’ll see that on Step 3: Message, you can now save and select message templates.
- To create your first template, overtype the existing Subject and Message text. Click Save as template. Please note that templates are visible for all staff.

- To view all saved template and use one in your signing request, click Select saved template. The saved templates will expand out underneath.

- From there, click Use Template to populate the template to your message fields. To read the template first, click the > icon to the right to expand it.

To read the full update head to: Saving and using message templates for signing requests.
1 March
We've introduced optional Text and Checkbox fields for document signing.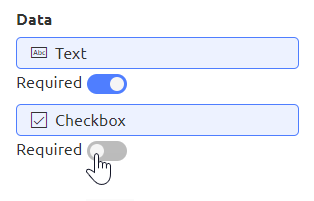
- By default, these fields will be set to Required.
- Toggle Required off to make the field optional (grey indicates the field has been toggled off, blue is on).
- You can place a mixture of required and optional Text and Checkbox fields, by toggling the Required button on or off before placing the field on the document.
- Once placed, the field will specify whether it is required.

February 2023
21 February
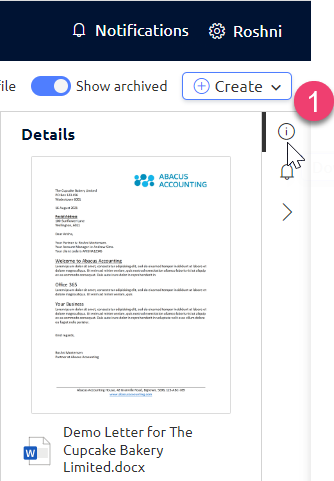
Our latest files and folders updates includes an improved details sidebar.
- If you have opened the details sidebar (done by clicking the info icon to the right of your files view), when selecting a file or folder you’ll notice the styling has been updated for simpler at-a-glance readability, with an optional expandable section for additional details.
- You can now easily see if a file or folder has been added to your Favourites from this sidebar.
- You can quickly copy to the clipboard a permanent link to the file or folder using the newly added ‘copy link’ button under ‘more details’.

- You can easily open a larger version of the thumbnail by clicking on the file preview in the sidebar.

16 February
Our latest signing updates include a new look and feel plus the following key changes:
- You'll notice that the Document signing drop-down option has been replaced by a button on the far right of your PDFs. This button is now used for the previous Sign & Save and Multi-sign options.

- We've broken down the signing stages into three steps: 1: Add signees, 2: Prepare Document and 3: Message

- Once you're at step 2: Prepare Document you can step back to step 1 to Add signees. Or if you're at the Message stage and need to edit, add or remove signees or signee fields, you can go back to step 1 or 2 without any of your edits being lost.
- If you're a Sign & Save user, you'll need to brush up on the new process here for signing and saving your own documents in SuiteFiles.
- If you need to add yourself as a signee, click the Add myself option.
- You can now send a document for signing to multiple people who use the same email address. You'll just need to enable Two-factor authentication for each person and add each person's mobile number (this cannot be the same number).
But wait there's more! To learn about the rest of the changes in this latest signing update please read the full article here: SuiteFiles Document Signing updates - February 2023.
January 2023
30 January
NEW! Signing Certificate
You can now view and download a signing certificate showing the history of a document signed using SuiteFiles signing.
To access the certificate, click the three dots alongside any document in the Document Signing Dashboard under More > Document Signing. Click View History.

On the Overview tab, click the Download document certificate button.

Please note: The 'Signing fields' count represents the number of "Signature" fields placed on the document. Initials, Full name, Date signed, Text and Checkbox fields are not counted.

This feature is compatible with files sent from today. Please note that while older files will still have a certificate, they may not include all details.
26 January
- New doc signing - Done! page after creating signing request.
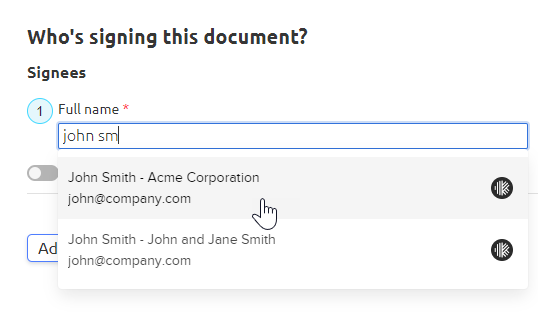
- Updated contact picker to '[Contact name] - [Client name]' format
- Fix for Connect Move window, you can now see all folders
18 January
When the 'Show archived' toggle is on, Quick Search and Advanced Search results will display Archived results. When the toggle is off, archived items will be omitted from search results.
Quick Search:

Advanced Search:
