Xero Merge Fields for Templates
Insert these merge fields into your file or email templates to populate your templates with your client and contact data from an integrated CRM like Xero Practice Manager
This guide will step you through:
- Date fields
- Client and contact fields
- Address fields
- Custom fields
- Business Values
- Using Checkbox Merge Fields with Conditions
Date fields
Any template can use the following date fields to populate dates whether SuiteFiles is connected to an integrated CRM or not:
|
Date Field [DATE:TODAY] |
Value Today's date formatted DD/MM/YYYY (e.g. 21/04/2016) |
Client and contact fields
When working with document and email templates in SuiteFiles you can add merge fields to them that will pull information about the client from the Xero Practice Manager (XPM) and display in the finished file. The field syntax to use and their corresponding data in XPM are:
|
Field Name [CLIENT:NAME] |
Value BUSINESS NAME |
Address Fields
There are many different address fields that can be pulled from XPM. A description of these are below:
The following receives the physical address of the client:
[CLIENT:ADDRESS]
[CLIENT:CITY]
[CLIENT:REGION]
[CLIENT:POSTCODE]
[CLIENT:COUNTRY]
The following receives the postal address of the client:
[CLIENT:POSTALADDRESS]
[CLIENT:POSTALCITY]
[CLIENT:POSTALREGION]
[CLIENT:POSTALPOSTCODE]
[CLIENT:POSTALCOUNTRY]
The following receives the postal address of the client first but if the postal address does not exist, then it defaults to the physical address:
[ADDRESS:POSTAL_OR_PHYSICAL]
[CITY:POSTAL_OR_PHYSICAL]
[REGION:POSTAL_OR_PHYSICAL]
[POSTCODE:POSTAL_OR_PHYSICAL]
[COUNTRY:POSTAL_OR_PHYSICAL]
Custom Fields
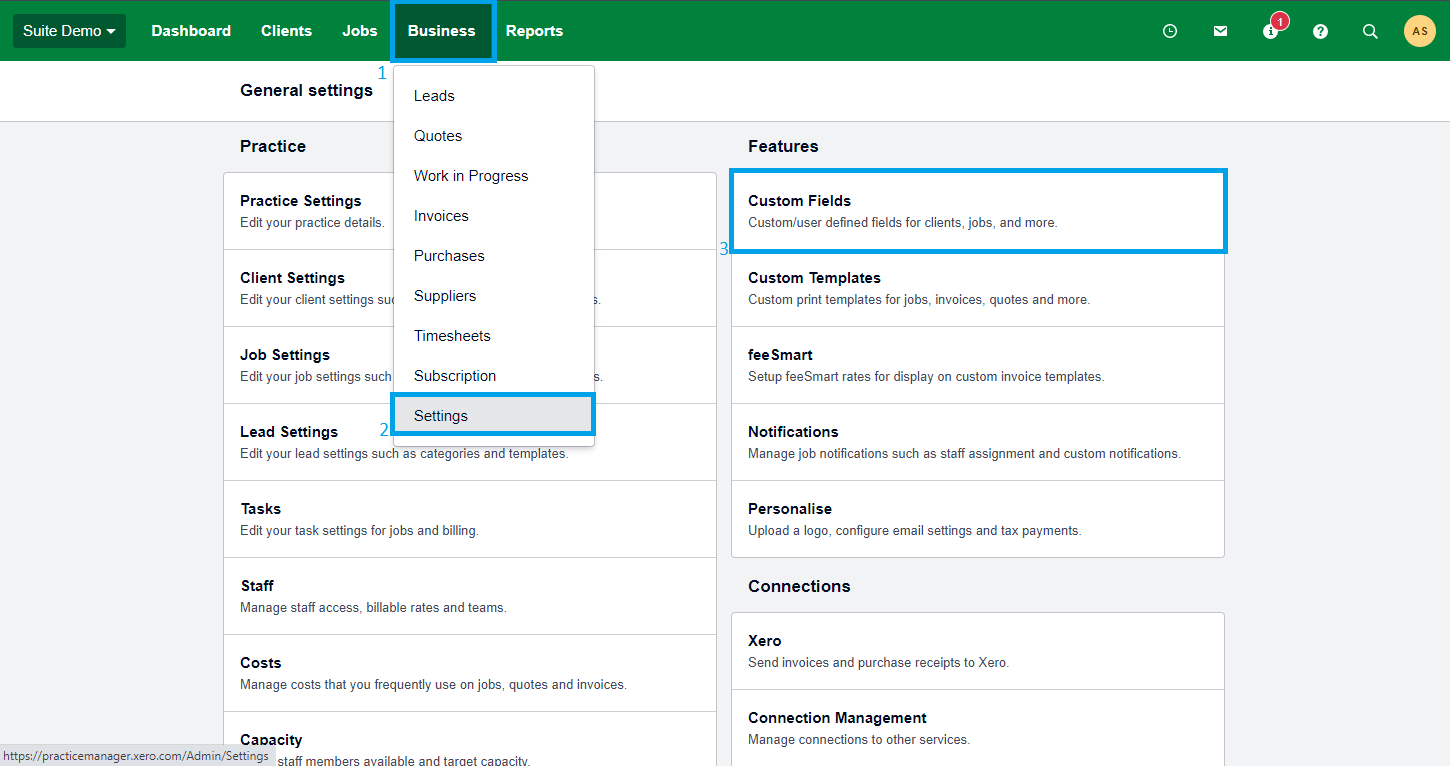
You can also create custom fields within XPM and use those as merge fields as well. To create a custom field for clients in XPM, go to Business > Settings and then select Custom Fields. On the Custom Fields page, select New Custom Field on the left hand side and this will bring you to a page which will allow you select multiple field types. When you create a custom field, ensure you select the Client checkbox under Usage so that the field is able to show up for all clients.
 Below are some examples of custom fields you can create:
Please note, underscores are used to represent spaces in the field name. When creating a custom field in XPM, underscores and spaces can be used interchangeably but the merge fields in your documents must use underscores.
|
Field Name [CUSTOM:ACCOUNTMANAGER] |
Value ACCOUNT MANAGER |
Business Values
Business Values allow you to pull through your own business details onto your SuiteFiles Templates. To enter these values, an Administrator can click their user name in the top right corner of SuiteFiles Web, click Admin settings, then select Prepopulation. Click the blue Edit Values button to update the Values. Once done, click Save Business Values. The Merge Field when entered into your template must be in CAPS, the Field Name can include a space
|
Field Name [BUSINESS:WEBSITE] |
Value WEBSITE |
Using Checkbox Merge Fields with Conditions
Merge fields also allow you to use conditions so that certain text will (or won't) be displayed depending on if certain checkboxes are ticked in XPM. To do this, we can use the conditions IF/ENDIF and IFNOT/ENDIFNOT at the beginning of the merge field. An example of this is shown below:
[IF:CUSTOM:GSTREGISTERED_CHECKBOX_TRUE] As you’re registered for GST we also need to do the following: Lorem ipsum dolor sit amet, consectetur adipisicing elit, sed do eiusmod tempor incididunt ut labore et dolore magna aliqua.[ENDIF:CUSTOM:GSTREGISTERED_CHECKBOX_TRUE]
[IFNOT:CUSTOM:GSTREGISTERED_CHECKBOX_TRUE] As you’re not GST registered there’s nothing to do[ENDIFNOT:CUSTOM:GSTREGISTERED_CHECKBOX_TRUE]
In the above examples, the first paragraph will only display if the GSTREGISTERED checkbox is ticked and the second paragraph will display if that same checkbox is not ticked. As you can see, in this way you can display different text for multiple clients depending on their personal details.
You can also use the merge field [CUSTOM:CHECKBOXNAME_CHECKBOX_YES] which will either display 'Yes' or 'No depending on whether or not the checkbox is ticked for the client.