We’ve recently updated our connection to the Xero API which means every SuiteFiles site must be reconnected to their Xero Practice Manager or WorkflowMax account by 23 October.
Please note:
- You’ll need to be a SuiteFiles Administrator, who is also an XPM/WFM Administrator in order to complete the steps below.
- If you need to make your XPM/WFM Administrator a SuiteFiles Administrator so that they can complete this reconnection process, please have one of your existing SuiteFiles Administrators follow the steps here.
- Only one person needs to complete this for your SuiteFiles site. Once connected, the changes will be reflected for all users.
- This process must be completed by 23 October to avoid any interruption to your team's ability to use the SuiteFiles and Xero Practice Manager or WorkflowMax integration.
- There are no visible functionality changes, this process will simply connect you to the Xero API in a new way.
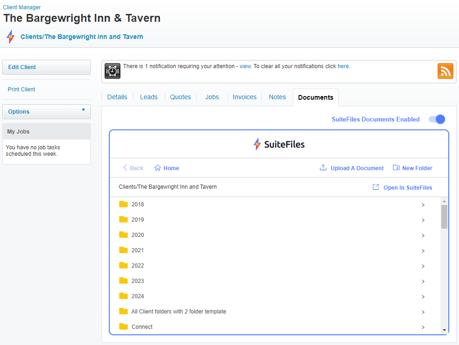
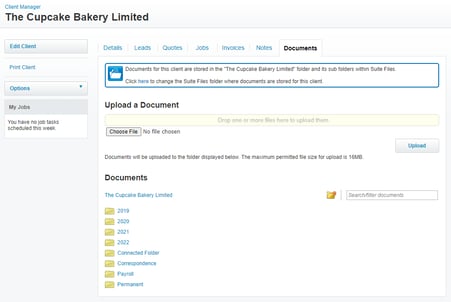
There are two sets of instructions below, one for those using the SuiteFiles Documents tab, and another for those using the XPM Documents tab. Please check which integration you're using by logging in and viewing one of your clients in XPM or WorkflowMax, comparing them to the screenshots below. If in doubt, please reconnect your integration using the XPM Documents tab option.
The SuiteFiles Documents tab looks like this:
The XPM Documents tab looks like this:
If using the SuiteFiles Documents tab, follow the steps below to reconnect your SuiteFiles and XPM or WFM integration
First, in XPM or WFM, authorise yourself to have permission to connect 3rd party systems.
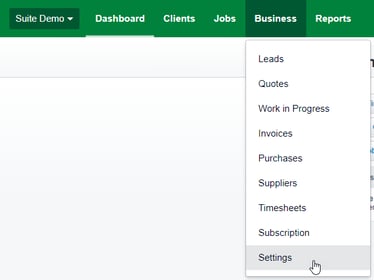
- Go to Business > Settings
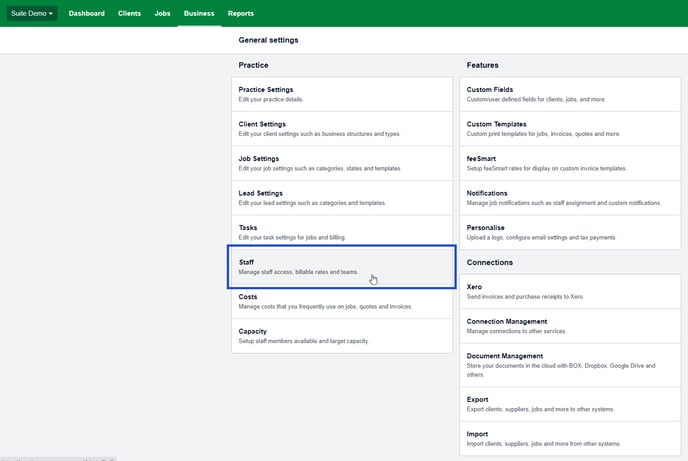
- Click Staff
- Click your name
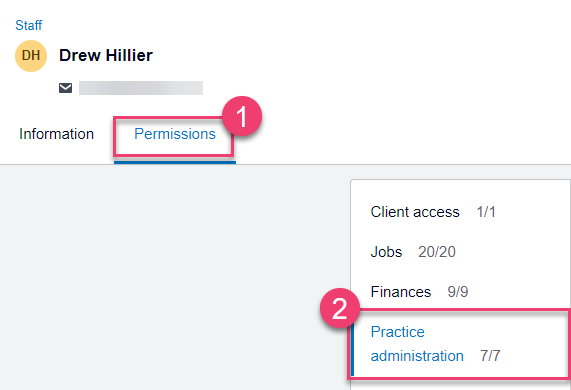
- Select the Permissions tab and select Practice administration
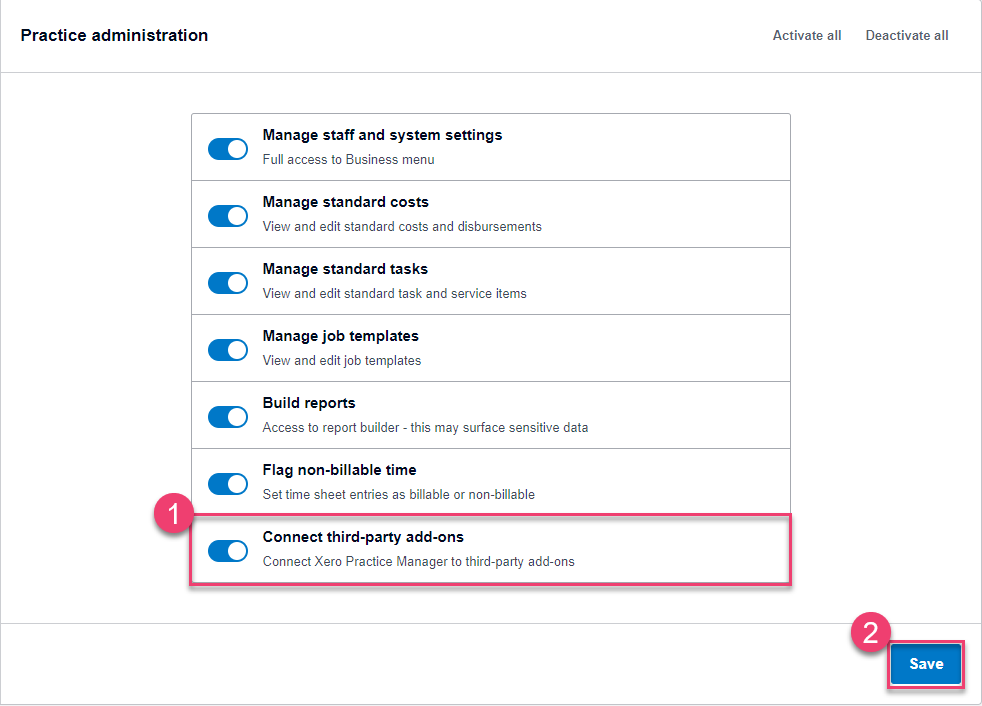
- Toggle on the Connect third-party add-ons, and click Save
Then, in the SuiteFiles Web App, connect your XPM or WFM account.
- Select your user name > Manage Integrations
-png-2.png)
NB: You'll need to be a SuiteFiles Administrator in order to see the Manage Integrations option. Try refreshing your SuiteFiles if you still cannot see this option. - You will be redirected to integrations.suitefiles.com
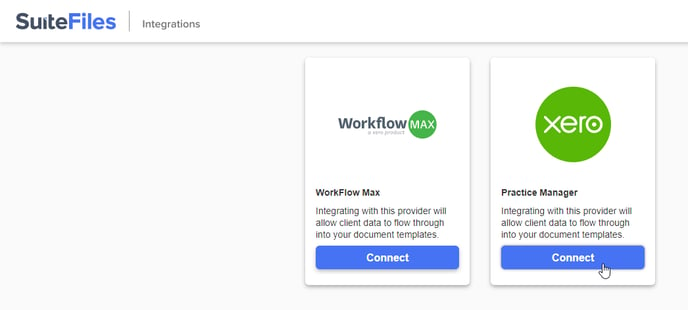
- Click Connect for either WorkFlow Max or Practice Manager depending on which platform you use
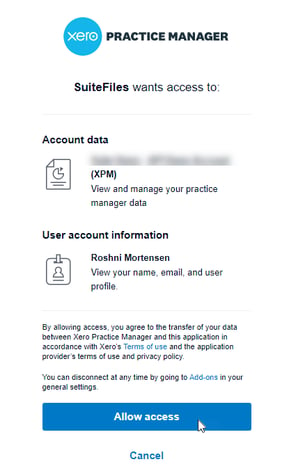
- Follow the on-screen prompts to sign into your XPM or WFM account, and allow the connection by selecting Allow access
- You’ll see the confirmation message 'Your SuiteFiles site has been successfully connected'. You can click Close on this message
- The integration that you’ve successfully connected to will now display Manage. You can close the Suite Integrations tab in your browser
- Everyone in your team must now refresh their SuiteFiles site by refreshing their browser, or by pressing CTRL + F5 on their keyboard. This will update all Clients and Contacts lists in SuiteFiles and allow you to populate file and email templates.
- Congrats! You and your team are now ready to continue using your XPM or WFM integration!
Questions or feedback? Contact us at support@suitefiles.com and let us know!
If using the XPM Documents tab, follow the steps below to reconnect your SuiteFiles and XPM or WFM integration
First, in XPM or WFM, authorise yourself to have permission to connect 3rd party systems.
- Go to Business > Settings

- Click Staff

- Click your name
- Select the Permissions tab and select Practice administration

- Toggle on the Connect third-party add-ons, and click Save

- Go back to Business > Settings
- Under the Connections section, select Document Management
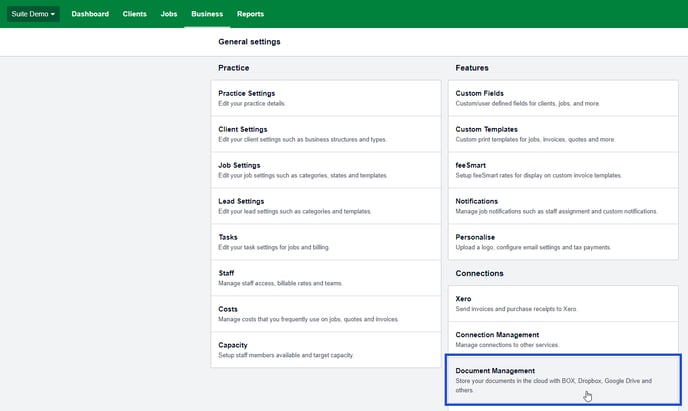
- Under 'SuiteFiles', select Disable to remove your existing connection
- Then click Enable to reconnect your integration with SuiteFiles
- You will be redirected to integrations.suitefiles.com
- Click Connect for either WorkFlow Max or Practice Manager depending on which platform you use

- Follow the on-screen prompts to sign into your XPM or WFM account, and allow the connection by selecting Allow access

- You’ll be redirected to the Document Management screen in XPM where the SuiteFiles option will now show Disable. This means you've successfully reconnected your integration.
- Everyone in your team must now refresh their SuiteFiles site by refreshing their browser, or by pressing CTRL + F5 on their keyboard. This will update all Clients and Contacts lists in SuiteFiles and allow you to populate file and email templates.
NB: If this does not refresh your Clients list immediately and your templates are not populating, please follow the Refresh Clients steps provided below.
Refresh Clients
If your Client file or email templates are not populating, you will need to Refresh your clients list in SuiteFiles manually. This can be done anywhere you see your clients list in SuiteFiles e.g. when creating a file from a template.
- Back in SuiteFiles, navigate to any of your Client folders in SuiteFiles
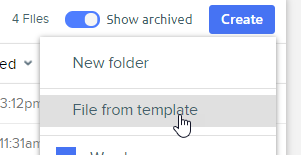
- Click Create, then File from template
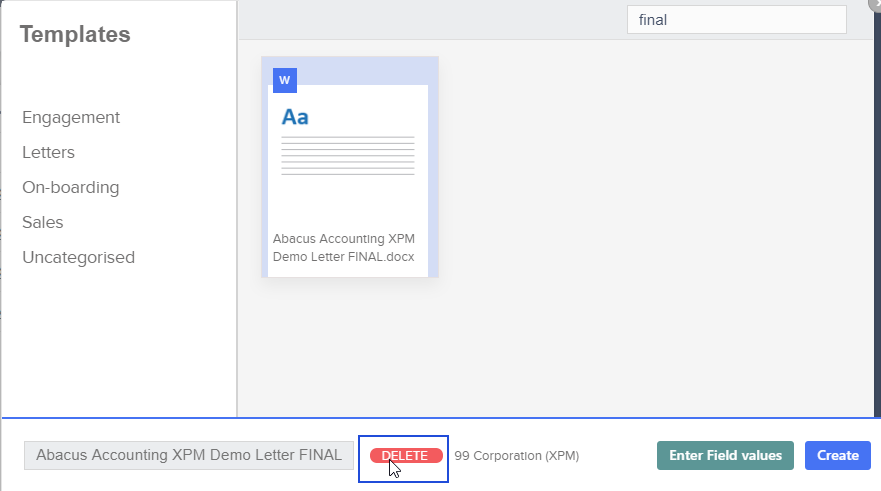
- On the Templates screen, delete any associated client by hovering over the red dot next to the client name, and selecting DELETE
- Place your cursor into the Choose a client... field, and select Refresh...
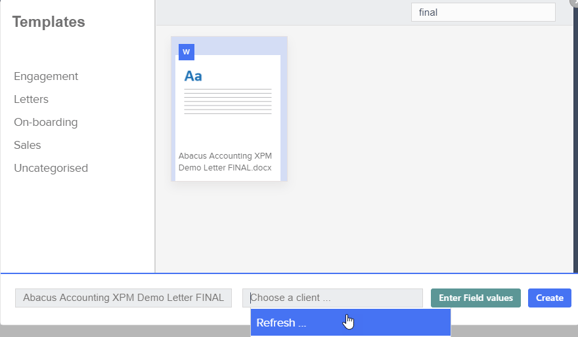
- After a few seconds, the Refresh... button will disappear. This means you've successfully refreshed your clients list.
- Everyone in your team must now refresh their SuiteFiles site by refreshing their browser, or by pressing CTRL + F5 on their keyboard. This will update all Clients and Contacts lists in SuiteFiles for them too.
- Congrats! You and your team are now ready to continue using your XPM or WFM integration!
Questions or feedback? Contact us at support@suitefiles.com and let us know!
