How do I request a file from my client?
Use SuiteFiles Connect to request files from your client and have them filed back into your chosen folder in SuiteFiles automatically.
Suite Tip: File requests can be created within any folder in SuiteFiles; you don’t necessarily have to request files from within a connected folder.
To request a file from your clients
- Navigate to the folder you would like the file to be submitted into
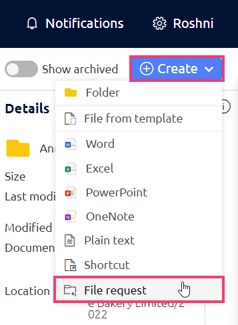
- Click the blue Create button in the top right corner of the folder
- Select File request… This will launch the Connect Portal Wizard for creating a File Request

- During step 1 of the wizard, enter your client’s name and email address, or if you have integrated with e.g. Xero Practice Manager or WorkflowMax, you can select a name/email address from the drop-down list.

- During step 2 of the Connect Wizard, you can add an expiry date, customise your message and toggle whether you want to add your own contact details to the email your client will recieve. You can save your message as a template to reuse for future file requests.

- Please note: there is a character limit of 256 characters in the subject line and 1024 in the body of the message.
- Step 3 of the wizard is where you can review the options you selected during your previous steps and view a preview of the email your client will receive.

- Your client will receive an email notification alerting them to your file request. They can then log into SuiteFiles Connect and complete the file request process. If this is the first time you’ve interacted with your client via Connect, they will also be asked to set up their SuiteFiles Connect account.
To review and track your tasks, please read: Where will my client's file requests be submitted?.
Please note: SuiteFiles Connect is not mobile compatible